Developer Guide
- Acknowledgements
- Setting up, getting started
- Design
- Implementation
- Documentation, logging, testing, configuration, dev-ops
- Appendix: Requirements
- Appendix: Instructions for manual testing
- Appendix: Planned Enhancements
- Appendix: Effort
Acknowledgements
Setting up, getting started
Refer to the guide Setting up and getting started.
Design
.puml files used to create diagrams in this document can be found in the diagrams folder. Refer to the PlantUML Tutorial at se-edu/guides to learn how to create and edit diagrams.
Architecture
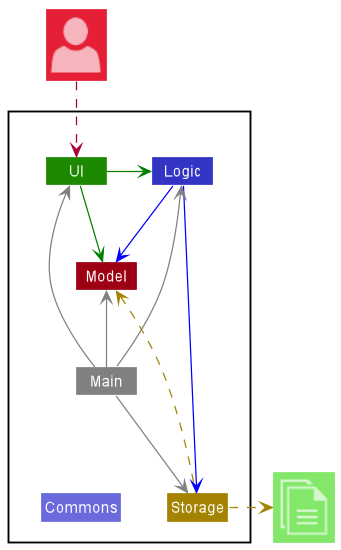
The Architecture Diagram given above explains the high-level design of the App.
Given below is a quick overview of main components and how they interact with each other.
Main components of the architecture
Main has two classes called Main and MainApp. It is responsible for,
- At app launch: Initializes the components in the correct sequence, and connects them up with each other.
- At shut down: Shuts down the components and invokes cleanup methods where necessary.
Commons represents a collection of classes used by multiple other components.
The rest of the App consists of four components.
-
UI: The UI of the App. -
Logic: The command executor. -
Model: Holds the data of the App in memory. -
Storage: Reads data from, and writes data to, the hard disk.
How the architecture components interact with each other
The Sequence Diagram below shows how the components interact with each other for the scenario where the user issues the command delete 1.
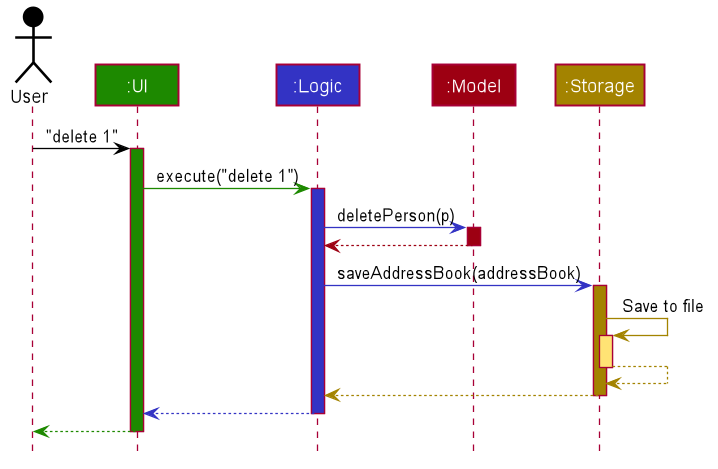
Each of the four main components (also shown in the diagram above),
- defines its API in an
interfacewith the same name as the Component. - implements its functionality using a concrete
{Component Name}Managerclass (which follows the corresponding APIinterfacementioned in the previous point.
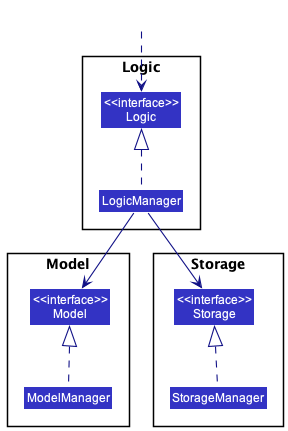
For example, the Logic component defines its API in the Logic.java interface and implements its functionality using the LogicManager.java class which follows the Logic interface. Other components interact with a given component through its interface rather than the concrete class (reason: to prevent outside component’s being coupled to the implementation of a component), as illustrated in the (partial) class diagram below.
The sections below give more details of each component.
UI component
The API of this component is specified in Ui.java

The UI consists of a MainWindow that is made up of parts e.g.CommandBox, ResultDisplay, PersonListPanel, StatusBarFooter etc. All these, including the MainWindow, inherit from the abstract UiPart class which captures the commonalities between classes that represent parts of the visible GUI.
The UI component uses the JavaFx UI framework. The layout of these UI parts are defined in matching .fxml files that are in the src/main/resources/view folder. For example, the layout of the MainWindow is specified in MainWindow.fxml
The UI component,
- executes user commands using the
Logiccomponent. - listens for changes to
Modeldata so that the UI can be updated with the modified data. - keeps a reference to the
Logiccomponent, because theUIrelies on theLogicto execute commands. - depends on some classes in the
Modelcomponent, as it displaysPersonobject residing in theModel.
Logic component
API : Logic.java
Here’s a (partial) class diagram of the Logic component:
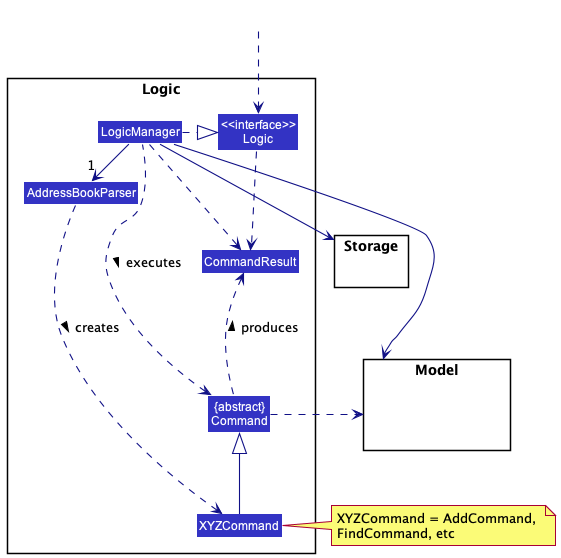
How the Logic component works:
- When
Logicis called upon to execute a command, it uses theAddressBookParserclass to parse the user command. - This results in a
Commandobject (more precisely, an object of one of its subclasses e.g.,AddCommand) which is executed by theLogicManager. - The command can communicate with the
Modelwhen it is executed (e.g. to add a person). - The result of the command execution is encapsulated as a
CommandResultobject which is returned back fromLogic.
The Sequence Diagram below illustrates the interactions within the Logic component for the execute("delete 1") API call.

DeleteCommandParser should end at the destroy marker (X) but due to a limitation of PlantUML, the lifeline reaches the end of diagram.
Here are the other classes in Logic (omitted from the class diagram above) that are used for parsing a user command:
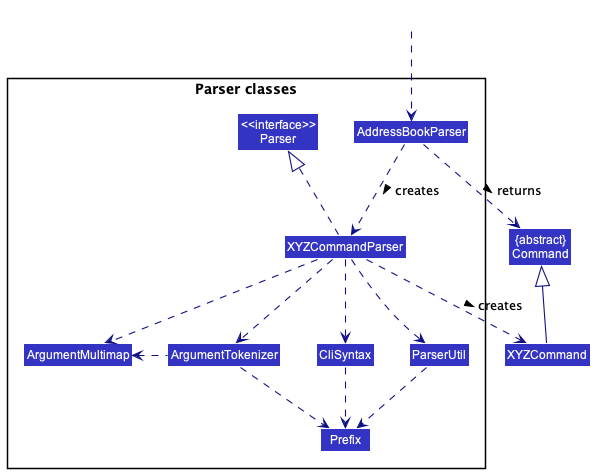
How the parsing works:
- When called upon to parse a user command, the
AddressBookParserclass creates anXYZCommandParser(XYZis a placeholder for the specific command name e.g.,AddCommandParser) which uses the other classes shown above to parse the user command and create aXYZCommandobject (e.g.,AddCommand) which theAddressBookParserreturns back as aCommandobject. - All
XYZCommandParserclasses (e.g.,AddCommandParser,DeleteCommandParser, …) inherit from theParserinterface so that they can be treated similarly where possible e.g, during testing.
Model component
API : Model.java
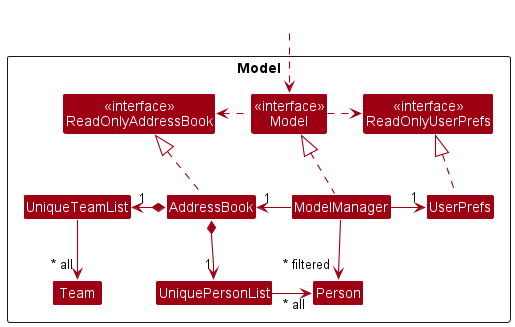
The Model component,
- stores the TeamBuilder data i.e., all
Personobjects (which are contained in aUniquePersonListobject) and allTeamobjects (which are contained in aUniqueTeamListobject). - stores the currently ‘selected’
Personobjects (e.g., results of a search query) as a separate filtered list which is exposed to outsiders as an unmodifiableObservableList<Person>that can be ‘observed’ e.g. the UI can be bound to this list so that the UI automatically updates when the data in the list change. - stores a
UserPrefobject that represents the user’s preferences. This is exposed to the outside as aReadOnlyUserPrefobjects. - does not depend on any of the other three components (as the
Modelrepresents data entities of the domain, they should make sense on their own without depending on other components)
Tag list in the AddressBook, which Person references. This allows AddressBook to only require one Tag object per unique tag, instead of each Person needing their own Tag objects.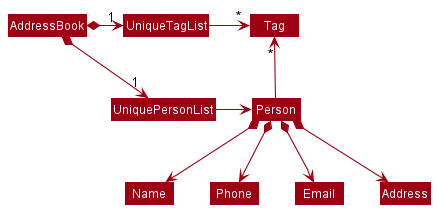
Storage component
API : Storage.java
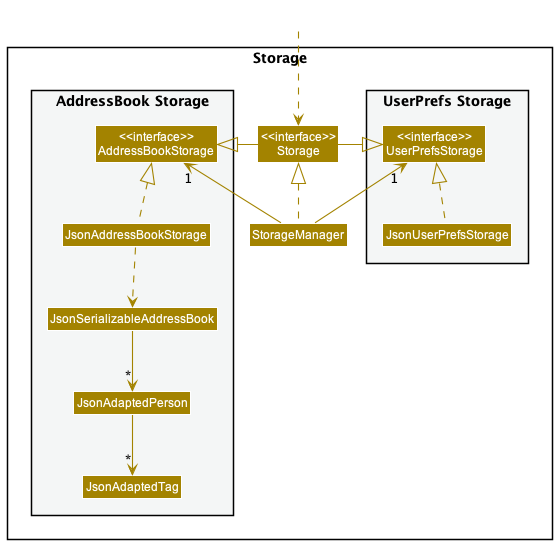
The Storage component,
- can save both TeamBuilder data and user preference data in json format, and read them back into corresponding objects.
- inherits from both
AddressBookStorageandUserPrefStorage, which means it can be treated as either one (if only the functionality of only one is needed). - depends on some classes in the
Modelcomponent (because theStoragecomponent’s job is to save/retrieve objects that belong to theModel)
Common classes
Classes used by multiple components are in the teambuilder.commons package.
Implementation
This section describes some noteworthy details on how certain features are implemented.
Add person feature
The add person feature allows for some fields to be optional. However, the person must have a name, and their name cannot be the same as another existing contact in TeamBuilder.
The interactions between components for the add command is similar to the delete command shown above.
Below shows the activity diagram when the user inputs the add command in the command box:
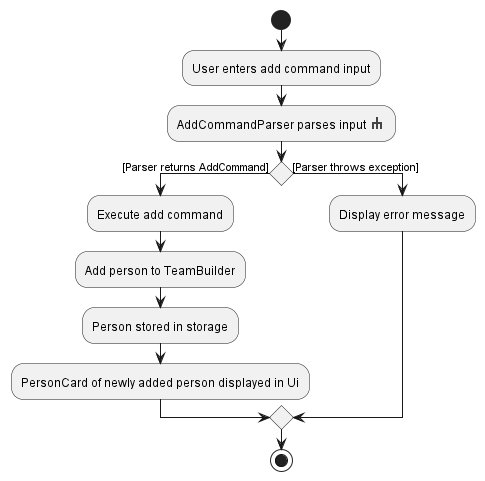
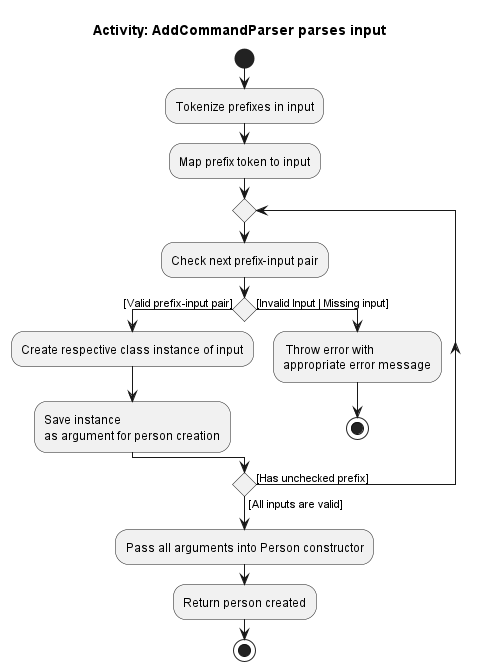
The rake symbol in the AddCommandParser parses input actions is used to indicate that the action is describes in another subsidiary activity diagram. The activity diagram is as shown below:
Create team feature
The activity diagram when user inputs create command in the command box is similar to the Add person feature shown above, with the difference being that Person objects are swapped with Team objects and error messages.
The same applies for CreateCommandParser, where the activity diagram is similar to AddCommandParser, with the difference being that the valid prefixes are now tn/ and td/ etc. The error messages are also catered towards Team creation, as opposed to Person creation.
Optional Fields feature
The AB3 implementation made it such that you could not add a contact without having all of their fields present. We felt this to be not user-friendly as for our purposes it is unreasonable for users to have the phone, email, address, and major of the contact they which to add.
Thus, we have made it such that the only mandatory field is the persons name.
Implementation
The implementation for the follow fields: Phone, Email, Major, Address have been made optional. The implementation to achieve this is similar across these fields. We use the Phone class as an example.
private static final Phone NO_PHONE = new Phone();

//...

private Phone() {
    value = "";
}
- The private constructor
Phone()takes in no arguments and returns a phone instance where the value is an empty string. - The private constructor is then used to create a static final
NO_PHONEphone instance. This will be used as a placeholder when users does not input a phone field/ phone field is empty.
Undo/Redo feature
Implementation
The undo/redo mechanism is based on the memento design pattern. Within the memento design pattern, there are three main classes:
-
Originator- The stateful object that becomes modified and requires to be restored usingundo/redo. -
Memento- The wrapper of a saved state of anOriginatorthat is used to restore theOriginator. -
Caretaker- The aggregator ofMementothat controls the sequence ofMementos forundo/redo.
The pattern can be implemented with the Originator and Memento as an «interface» to allow for better extension and reduce decoupling.
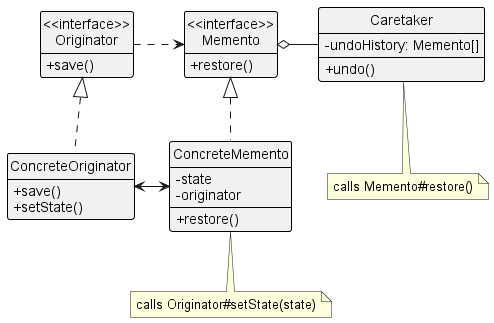
While the Memento Design Pattern is mostly used for undo, we can extend its functionality to include redo.
Implementing this design pattern results in the following:
-
Modelinferface extends theOriginatorinterface, resulting in a concreteOriginatorinModelManger. -
TeamBuilderMementoimplements theMementointerface and acts as a saved state ofModelManager -
HistoryUtilreplaces theCaretakerand tracks the timeline and order ofMemento - Any modifying
Commandwill callHistoryUtil#storePastwithModel#save()and theirCOMMAND_WORDor a description of what changed.
(AddCommandis given as an example.)
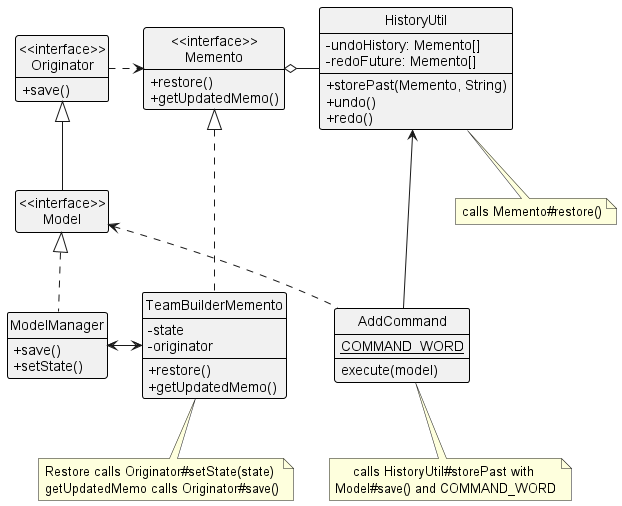
As we want undo/redo to provide feedback to the user, the Commands must provide context to HistoryUtil
Given below is an example usage scenario and how the undo/redo mechanism behaves at each step.
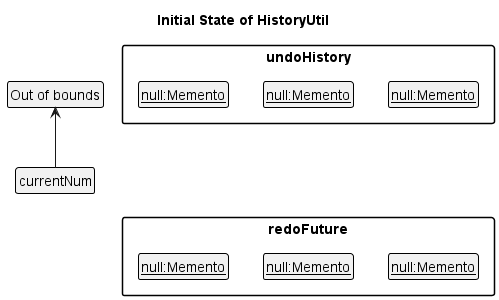
Step 1.
The user launches the application for the first time. The HistoryUtil will be initialized with two empty Memento arrays, one for undo and another for redo. The currentNum, an array index, will be -1 indicating totally empty arrays.
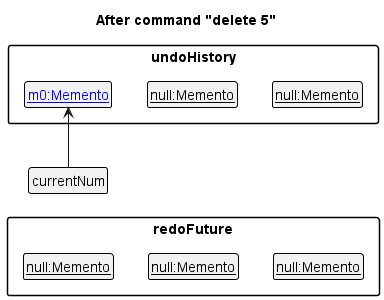
Step 2.
The user executes delete 5 command to delete the 5th person in the team builder. The delete command calls Model#save() before any actions, causing the initial state of the team builder to be saved as a Memento. The delete command provides the resutling Memeto and the context of the change (deleting 5) to HistoryUtil#storePast. The Memento is saved in undoHistory and the currentNum, the array index, increases to 0.
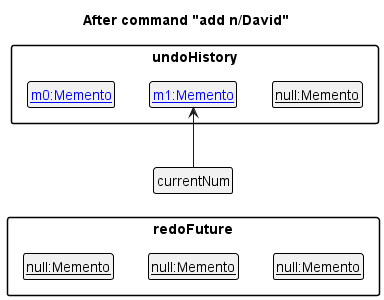
Step 3.
The user executes add n/David … to add a new person. The add command also calls Model#save() before any actions, saving another Memento. The Memento and description (add n/david …) is stored through HistoryUtil#storePast. The Memento is saved in undoHistory and the currentNum increases to 1.
Model#save(), so the Memento is not stored in HistoryUtil.
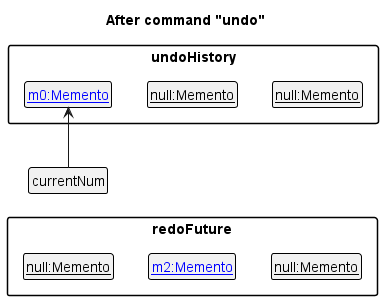
Step 4.
The user now decides that adding the person was a mistake, and decides to undo that action by executing the undo command.
The undo command will call HistoryUtil#undo.
HistoryUtil#undo will then operate as follows:
-
Memento#getUpdatedMemois called onundoHistory[currentNum], generating aMementoof the current state. - The resulting
Mementois saved intoredoFuture[currentNum]. - Then,
Memento#restoreis called onundoHistory[currentNum] - An
Optional<String> descriptionis returned
The undo command then feedbacks to the user that the undo has occured successfully along with a description if any.
currentNum is at index -1, then there are no previous TeamBuilder states to restore. In this case, HistoryUtil#undo returns Optional.empty().
As undo command uses Optional::isPresent to check if undo is successful, it will then return an error message to the user.
The following sequence diagram shows how the undo operation works:

UndoCommand should end at the destroy marker (X) but due to a limitation of PlantUML, the lifeline reaches the end of diagram.
The redo command does the opposite — it calls HistoryUtil#redo(), which checks the redoFuture for any Memento to restore at counterNum. If present, the Memento is restored and a Optional<String> containing the description of the Memento is given to the redo command. The restored Memento is moved to undoHistory and removed from redoFuture. The redo command feedbacks the output to the user.
counterNum is at an index where redoFuture is null, then there are no undone Memento to restore. The redo command uses the Optional<String> output Optional::isPresent to check if this is the case. If so, it will return an error message the user.
Step 5.
The user then decides to execute the command list. Commands that do not modify the TeamBuilder, such as list, will usually not call Model#Save(), HistroyUtil#storePast , HistroyUtil#undo, HistoryUtil#redo. Thus, the Model remains unchanged.

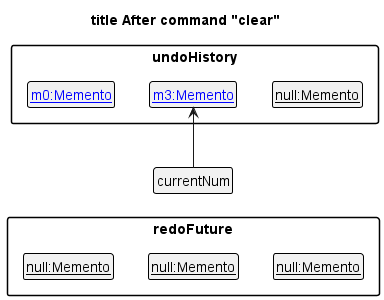
Step 6.
The user executes clear, which calls Model#Save and stores the resulting Memento and description (clear) into HistoryUtil#storePast. Since there is a new Memento for undoHistory that is not from redoFuture, all Memento in redoFuture are purged.
Reason: It no longer makes sense to redo the add n/David … command. This is the behavior that most modern desktop applications follow.
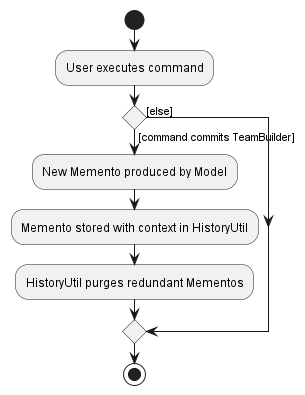
The following activity diagram summarizes what happens when a user executes a new command:
Design considerations:
Aspect: How undo & redo executes:
-
Alternative 1 (current choice): Saves the state of the team builder found in ModelManager (Current choice).
- Pros: Easy to implement, easy to extend, easy to modify what “state” is saved and restored.
- Cons: May have performance issues in terms of memory usage if state saved is too large.
-
Alternative 2: Individual command knows how to undo/redo by
itself.
- Pros: Will use less memory (e.g. for
delete, just save the person being deleted). - Cons: We must ensure that the implementation of each individual command are correct.
- Pros: Will use less memory (e.g. for
-
Alternative 3: Save the entire team builder inside VersionedTeamBuilder, replacing TeamBuilder (Original AB-3 Choice)
- Pros: Easy to implement.
- Cons: Difficult to extend. Performance issues in terms of memory usage. Undo/Redo timeline tied to TeamBuilder. No user feedback on what command was undone/redone.
Sort feature
Both fields for sorting persons are compulsory, namely the order of sorting and the sort by criteria. The order and sort by criteria that are available are listed in the User Guide.
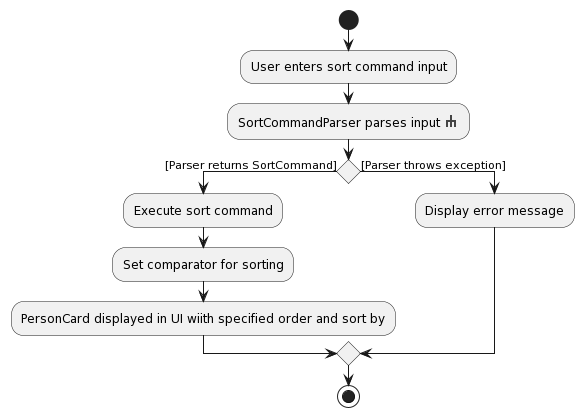
Below shows the activity diagram when the user inputs the sort command in the command box:
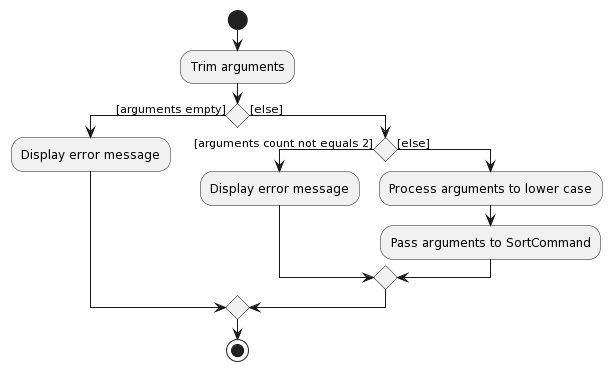
The subsidiary diagram, for SortCommandParser, is as shown below:
Implementation
The filteredPersons variable in the ModelManager.java is defined by passing in the getPersonList() from addressBook
into a FilteredList object. However, sortedPersons variable in the ModelManager.java is instead defined by passing
in filteredPersons into a SortedList object.
This ensures that modifications (deletes/edits) to the persons after a list or sort command will be consistent.
Design considerations:
The parse function in SortCommandParser.java is used to trim and process the arguments before instantiating
SortCommand object. The execute function in SortCommand is used to identify the order and sort by to be used by the
comparator and to run the sort with the comparator. This ensures that subsequent additions to sort by, such as sort by
name etc, would only require to edit the execute function.
The SortBy Enum ensures that new sorting options can be extended in future iterations. A new switch case can be added
to the SortCommand to perform an updateSort() for the Model object, with the corresponding comparator.
Show Team feature
The field for show team is compulsory. The current implementation requires user to input names of the targeted teams.
Below shows the activity diagram when the user inputs the show command in the command box:
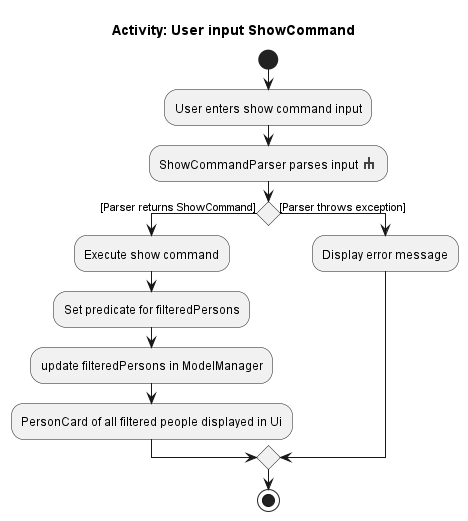
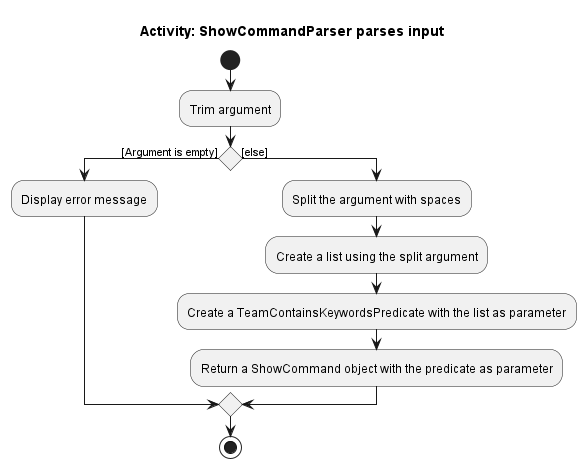
Below shows the activity diagram for the details of parsing show command:
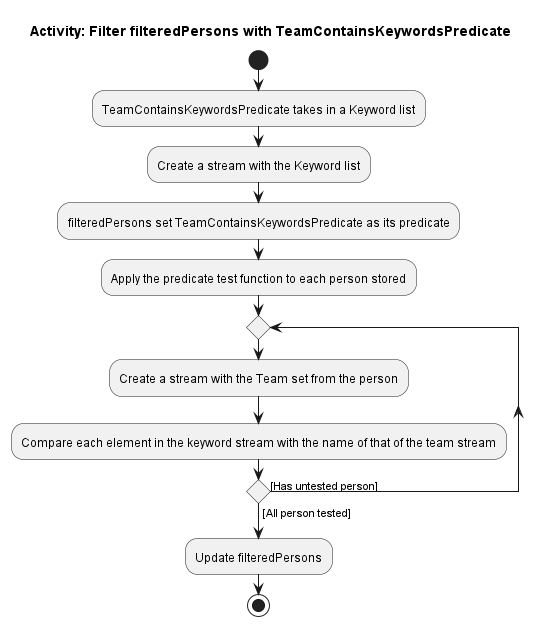
Below shows the activity diagram about the predicate processing of show command:
Implementation
Show command utilizes the updateFilterPersonList() method implemented in ModelManager.java to filter the
filteredPersons list variable in ModelManager with the given predicate TeamContainsKeywordsPredicate.
The TeamContainsKeywordsPredicate object takes in a List<String> from ShowCommandParser, and make use of the
containsWordIgnoreCase() from StringUtil to conduct matching between the user input and the tagName of each
the teams of each Person object.
Design considerations:
The parse function in ShowCommandParser.java will trim the arguments and create a predicate object with the input
after the command prefix. This predicate is passed to ShowCommand as a parameter. This ensured that this feature can
take other predicate in future iterations. Currently, there is only one predicate that search the keywords among team
names. When there are demands such as searching keywords among team requirements, new predicates can be created and
ShowCommand can easily adapt to new iterations.
TeamContainsKeywordsPredicate.java is created to facilitate the comparison between keywords and tagName of team.
Documentation, logging, testing, configuration, dev-ops
Appendix: Requirements
Product scope
Target user profile:
- looking to form teams for hackathons/competitions/projects
- prefer desktop apps over other types
- can type fast
- prefers typing to mouse interactions
- is reasonably comfortable using CLI apps
Value proposition: group based on expertise/competence/availability/goals to find better teammates
User stories
Priorities: High (must have) - * * *, Medium (nice to have) - * *, Low (unlikely to have) - *
| Priority | As a … | I want to … | So that I can… |
|---|---|---|---|
* * * |
new user | delete the sample contacts | start finding actual teammates |
* * * |
new user | delete a contact | remove contact deemed unsuitable for any team |
* * * |
normal user | add a contact | find their info for later use |
* * * |
normal user | add tags to contacts | see what their proficiencies are and what they are look to accomplish |
* * * |
normal user | edit a contact | rectify changes or mistakes |
* * * |
normal user | view contact list | see all my contacts |
* * |
first time user | see some sample contacts when I open the app | easily try out its features without needing to add my data first |
* * |
first time user | see a help message explaining features to try first | start by trying features that are more suited for new users |
* * |
forgetful user | have a clear contact list for my social hub | Have quick access to my contact lists to find the target person |
{More to be added}
Use cases
(For all use cases below, the System is the TeamBuilder and the Actor is the user, unless specified otherwise)
Use case: Add a contact
MSS
- User enters add command followed by input fields.
- TeamBuilder parses input with AddCommandParser.
- TeamBuilder creates AddCommand.
- TeamBuilder executes AddCommand.
-
TeamBuilder saves person in model and storage.
Use case ends.
Extensions
- 2a. Inputs for command invalid.
- 2a1. TeamBuilder displays error caused by invalid field/ missing field.
-
2a2. TeamBuilder displays valid format for add command.
Use case ends.
- 4a. User inputs name which already exists in TeamBuilder.
-
4a1. TeamBuilder displays error message indicating duplicate name.
Use case ends
-
Use case: Delete a contact
MSS
- User requests to list contacts.
- TeamBuilder shows a list of contacts.
- User requests to delete a specific contact in the list.
-
TeamBuilder deletes the person.
Use case ends.
Extensions
-
2a. The list is empty.
Use case ends.
-
3a. The given index is invalid.
-
3a1. TeamBuilder shows an error message.
Use case resumes at step 2.
-
Use case: List all contact
MSS
- User requests to list contacts.
- TeamBuilder shows a list of contacts.
- User requests to edit a specific contact in the list.
-
TeamBuilder edit the person.
Use case ends.
Extensions
-
2a. The list is empty.
Use case ends.
-
3a. The given index is invalid.
-
3a1. TeamBuilder shows an error message.
Use case resumes at step 2.
-
{More to be added}
Non-Functional Requirements
- Should work on any mainstream OS as long as it has Java
11or above installed. - Should be able to hold up to 1000 persons without a noticeable sluggishness in performance for typical usage.
- A user with above average typing speed for regular English text (i.e. not code, not system admin commands) should be able to accomplish most of the tasks faster using commands than using the mouse.
{More to be added}
Glossary
- Actor: In the context of use cases, the actor is a role that a person play when using the system.
- API: (Application Programming Interface) How separate components of the program communicate with each other.
- Architecture: Referring to software architecture, showing overall organization of the system.
- Framework: A set of pre-written code containing predefined classes and functions that helps developers build a software.
- GUI: (Graphical User Interface) A Ui using icons, menu, and mouse to interact with the system.
- JavaFX: A framework used to create user interfaces in java.
- Mainstream OS: Windows, Linux, Unix, OS-X
- Parsing: In the context of our program, parsing is to transform a piece of user input into something that can be run by our program
- Private contact detail: A contact detail that is not meant to be shared with others
- Sequence Diagrams: User to model the interactions between entities in a system within a specific scenario.
- UI: (User Interface) Where the human interacts with the program.
Appendix: Instructions for manual testing
Given below are instructions to test the app manually.
Launch and shutdown
-
Initial launch
-
Download the jar file and copy into an empty folder
-
Double-click the jar file Expected: Shows the GUI with a set of sample contacts. The window size may not be optimum.
-
-
Saving window preferences
-
Resize the window to an optimum size. Move the window to a different location. Close the window.
-
Re-launch the app by double-clicking the jar file.
Expected: The most recent window size and location is retained.
-
-
{ more test cases … }
Deleting a person
-
Deleting a person while all persons are being shown
-
Prerequisites: List all persons using the
listcommand. Multiple persons in the list. -
Test case:
delete 1
Expected: First contact is deleted from the list. Details of the deleted contact shown in the status message. Timestamp in the status bar is updated. -
Test case:
delete 0
Expected: No person is deleted. Error details shown in the status message. Status bar remains the same. -
Other incorrect delete commands to try:
delete,delete x,...(where x is larger than the list size)
Expected: Similar to previous.
-
-
{ more test cases … }
Creating a team
-
Creating a team
-
Test case:
create tn/Team A td/Team for upcoming hackathon t/Python t/ReactNative
Expected: Team A is created in the team panel on the right. Team name is shown in the status message. -
Test case:
create tn/Team B t/Python t/ReactNative
Expected: No team is created (no team description in command). Error details shown in the status message. -
Other incorrect create commands to try:
create,create td/Team for upcoming hackathon t/Python t/ReactNative,...
Expected: Similar to previous.
-
Show teams
-
Show all members under certain teams
-
Prerequisites: Create two teams with command
create. Multiple persons in the list. Add person one in team one with commandedit. Add person two in team one and team two. Add person three in team two. -
Test case:
show Name_of_Team_One
Expected: Person one and person two are listed in the person panel on the left. Other people are filtered out. -
Test case:
show Name_of_Team_Two
Expected: Person two and person three are listed in the person panel on the left. Other people are filtered out. -
Test case:
show Name_of_Team_One Name_of_Team_Two
Expected: Person one, two, three are listed in the person panel on the left. Other people are filtered out. -
Other incorrect show commands to try:
show,show Name_of_Not_Created_Team,...
Expected: Error details shown in the status message.
-
Sorting persons
-
Sorting persons
-
Test case:
sort desc tcount
Expected: Sort persons by tag count in descending order. ‘Sorted all persons.’ is shown in the status message. -
Test case:
sort tcount
Expected: No sorting occurs (no order in command). Error details shown in the status message. -
Other incorrect sort commands to try:
sort,sort desc,...
Expected: Similar to previous.
-
Undo/Redo
-
Undoing a clear while some contacts are being shown
-
Prerequisites: Find some contacts using the
findcommand. Some but not all contacts in the list. Then useclearresulting in an empty Team Builder. -
Test case:
undo
Expected: The Team Builder is restored and no longer empty. Some but not all contacts are in the list, asfindwas used. Usinglistthen should show the entire contact list still present.
-
Appendix: Planned Enhancements
Adding and removing tags from persons
Currently, to add a Tag to a contact, one has to use the edit command to add a tag to the contact. There are main drawback is that the user has to input all the tags the person already has, as the edit command will remove all tags and only assign tags given in the command.
Similarly, to remove a Tag, the user has to use the edit command and type all the tags the person has and omit the ones that the user wishes to remove.
This is rather tedious for the user and negatively affects user experience.
Enhancement:
Allow users to add and remove tags specifically, users only need to input the tags they wish to add/remove.
Suggested implementation:
Create two commands, add-tag and remove_tag with the following input format:
add_tag <PERSON_INDEX> t/<TAG_NAME> [t/<TAG_NAME> ...]
remove_tag <PERSON_INDEX> t/<TAG_NAME> [t/<TAG_NAME> ...]
-
<PERSON_INDEX>is the index of the person shown on the person list of the Ui. If there is no person at the given index, the command will throw an error. This field is required. -
<TAG_NAME>is the name of the tag the user wishes to add to a person. If the command isremove_tagand the tag is not found in the contact, an error will be thrown. This field is required. -
[t/<TAG_NAME> ...]is/are additional tags users wish to add/remove from the person at the same time. If the comamnd isremove_tagand the tag(s) are not found in the contact, and error will be thrown. This field is optional.
Adding/removing persons to/from teams
Currently, to add a person to a team, one has to use the edit command to add a team tag to the contact. There are significant drawbacks to this:
- User has to type out the entire team name in the team tag.
- User has to input all the teams that the person is already in, else the edit command will remove those tags from the person.
This negatively impacts user experience as the process of adding and removing persons from teams becomes time-consuming and prone to typos.
Enhancement:
Instead of using the team names, users will be able to add and remove persons using the team index on the team list.
Suggested implementation:
Create two new commands, add_to_team and remove_from_team, both of which will have the following format:
add_to_team <PERSON_INDEX> <TEAM_INDEX> [<TEAM_INDEX> ...]
remove_from_team <PERSON_INDEX> <TEAM_INDEX> [<TEAM_INDEX> ...]
-
<PERSON_INDEX>is the index of the person shown on the person list of the Ui. If there is no person at the given index, the command will throw an error. This field is required. -
<TEAM_INDEX>is the index of a team shown on the team list of the Ui. If there is no team at the given index, the command will throw an error. This field is required. -
[<TEAM_INDEX> ...]is/are additional teams that the user wants to add/remove a person to/from. For example, user can inputremove_from_team 1 1 2 3, and this will remove the person at index 1 from the teams at index 1, 2, and 3. The additional team(s) are optional.
Long Fields support
Person fields and team fields
Fields that are too long and are cut off by the Ui are to be truncated and indicated with ellipses.
- E.g. if a person name is “Salvador Felipe Jacinto Dalí y Domenech” and cannot be displayed fully, the Ui should replace it with “Salvador Felipe Jac…”, with the ellipses ending at the cut-off.
- Users should also be able to view the full length of the field by hovering their mouse over that particular field.
- Same goes for tags, if the tags of a contact/team takes up more than two rows, the remained will be hidden, and an indicator will appear to show how many tags are hidden
-
E.g. A contact with 230 tags may only have 14 tags shown on the Ui, and at the end of the displayed tag a text
"... +216"will indicate that they have 216 more tags that are hidden.
Tags (Skill tags, team tags, person tags)
Tags that are longer than 20 characters to be truncated on the Ui. Users can then hover their mouse over it to see the full tag.
- E.g. The Tag “Grandmaster in Witchcraft and Wizardry” will appear as “Grandmaster in Witch…” on the Ui.
Appendix: Effort
TeamBuilder is a brownfield project which builds upon the existing features of AB3. Our vision for TeamBuilder, although simple conceptually, proved to be challenging to implement due to AB3’s pre-existing architecture.
Challenges with dependencies between Teams and Persons
The ability to create teams and add persons into TeamBuilder is the highlight of our project. It proved to be monstrous task, requiring thorough changes in every component of the AB3 Architecture.
- While AB3 only has Contacts, we wanted TeamBuilder to also have Teams, which is another entity. Teams and Persons are both dependent on each other, as a person cannot be part of a non-existent team, and a Team cannot have a non-existent person.
- Deleting person and teams proved to be a huge challenge for TeamBuilder, as when a team is deleted, any person that is part of the team has to be updated such that they no longer have that team tag. Similarly, when a person is deleted, Teams have to be updated such that that person is also removed from the team.
- Additionally, this same issue caused problems for the Storage component. Should the storage contain a person that is part of a Team that does not exist, or a Team contain a person that does not exist, TeamBuilder has to be able to catch these errors and act appropriately.
The large degree of inter-dependencies made implementing a relatively ‘simple’ feature such as adding a person or deleting a team to require much time and effort in understanding AB3’s implementation, as well as coming up with solutions to achieve our goal.
High effort required for test cases.
TeamBuilder differs greatly from AB3 as all persons’ fields are optional except for their name, and TeamBuilder has Teams as well as persons. As a result, sizeable chunks of tests from AB3 are not relevant, and the Team had to reformat most of the tests, as well as generate and create new Sample data to test.